Events and Webhooks Explained
Small code snippets linked to a web application, commonly called webhooks, are used to facilitate communication between two separate systems. Fast, automated, and easy to configure are widely used in online business applications.
Why is it handy to use them? What’s the link between events and webhooks? And how to configure webhooks to benefit the most?
Read on to find out.
It All Starts With an Event
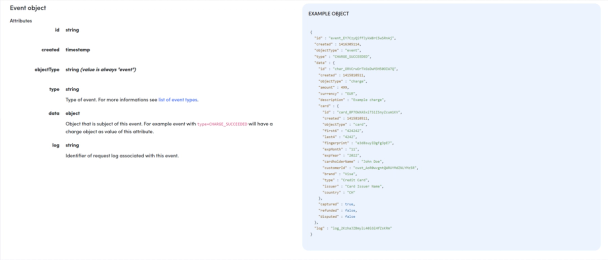
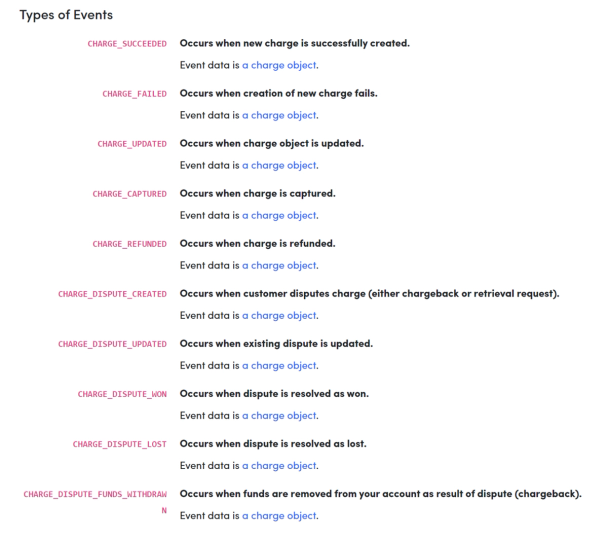
What is an event? It’s every single change that happens on the merchant’s account. When any of the predefined events occur, we create a new event object.

What do we mean by an event? Well, it might be a successful charge, a chargeback, a dispute, an updated subscription, a newly created cross-sale offer, and many others. Literally, everything that has happened on the account (example below).

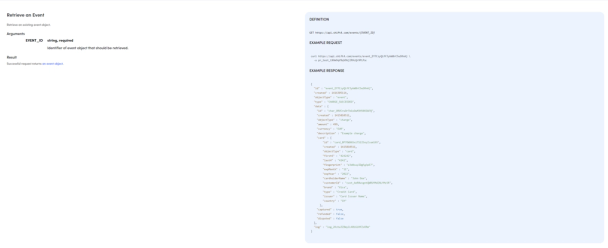
Since all the events are registered, it is easy to access them via our API in the web console and track them back step-by-step if necessary.
Yet, it is also possible to synchronize the system with our payment platform, send events to the designated unique URLs, and get automated notifications once the events happen. And it’s all because of webhooks.
What Is a Webhook?
Simply put, it’s an automated message sent to users any time some predefined event takes place. Or, to be more precise, it’s an HTTP request (or small code snippets linked to a web application) triggered by an event created in a source system.
Once the event is created in the source site, the data is automatically collected and sent off to a specified URL.
Such automated communication between the source and the destination facilitates and speeds up the information flow, thus allowing users to receive notifications about the events precisely when they occur.
Convenient Webhook Configuration
The whole process can be completed within the Shift4 account settings. The merchant provides their endpoints (URLs) to Shift4 and receives the webhooks in return.
The key is to maintain and process them accordingly to ensure proper synchronization throughout the entire period of the webhook configuration.
It’s good to know that each webhook URL can be configured either for a test or live mode.
As the name implies, the test-mode configured URL will receive events created in test mode, whereas live-mode one will respond to events created in live mode.
Once the configuration is completed, our system will call the merchant’s page with the information about the event every time such an event appears.
When it comes to processing and sending information via webhooks, Shift4 is a market leader. Doing so in under a second is standard practice for us. In payments, time is an issue, and there’s no room for unnecessary delays.
Receiving Webhooks
Each and every time a new event is created, our system sends a webhook to the corresponding configured webhook URL.
The event data is encoded as JSON and sent to the merchant in the request body.
What’s important is the fact that with webhooks, it is the merchant’s server that receives the webhook requests.
Therefore, for security reasons, it’s recommended to only use an event identifier from a webhook request and obtain the remaining data by making a direct request to the Shift4 API (see retrieving an event).

To protect your business from replay attacks, it is also advised to record which events were processed and never process the same event twice.
Responding To Webhooks
When the webhook request has been processed successfully, the returned status code must be 200 HTTP. Otherwise, it is assumed that the request delivery failed. Any other return code is ignored by the system, and failed webhook requests are resent with an increasing delay between subsequent attempts.
If the situation with the return code remains unchanged after an adequate amount of time, Shift4 will contact the merchant to resolve the issue.
Since events are always delivered in the same order they were created, the others won’t be sent if one event fails to be delivered.
It results from the fact that delivery of all events for a particular webhook URL is blocked until the one that failed is successfully retried. Simply put, all events need to be delivered in chronological order.
AWS At Your Service
When using webhooks, you must use the HTTP unless you’re using the power of Amazon Web Services, as many of our merchants do.
In that case, you can simply integrate your webhook URL with SQS, SNS, or Amazon Kinesis.
- SQS — Amazon Simple Queue Service (SQS) enables sending, storing, and receiving messages between software components at any volume without losing messages or requiring other services to be available. Set up a FIFO (first in, first out) queue and have us send webhooks to it. That’s way more secure than sending it through the Internet.
- Kinesis — With the use of Amazon Kinesis it is easy to collect, process, and analyze streaming, real-time data and get timely insights, thus reacting quickly to new information. Connect webhooks to Kinesis and unleash the power of this fantastic tool.
- Simple Notification Service — Amazon Simple Notification Service (SNS) sends notifications in two ways: A2A (Application-to-Application messaging) and A2P (Application-to-Person messaging). While A2A works between serverless applications, A2P lets you send messages to your customers via SMS, push notifications, and email.Take advantage of the Amazon Simple Notification Service and get email or text notifications as soon as the events occur.
Unlock Real-Time Insights with Webhooks
Using webhooks to integrate systems is not just about efficient communication; it’s a strategic move for businesses looking to gain real-time insights.
By embracing this seamless integration, merchants can stay ahead of the curve, respond quickly to evolving events, and ensure a secure, fast, and synchronized flow of information.
Take your business responsiveness to the next level and embrace the future of dynamic event handling with this powerful integration.